How to deploy a django project with Apache
參考連結:
How to deploy a django project with Apache ~ Innuy Developers Blog
超痛恨python的安裝,總是許多坑…這次django的伺服器架設也不例外。 網路上的資源一堆但是版本也是五花八門眼花撩亂(e04)。
以下是我自己安裝測試成功的解法:
步驟一 確認在虛擬環境下執行
裡面有安裝virtualenv方法:
macOS: Install OpenCV 3 and Python 2.7 - PyImageSearch
步驟二 apache安裝:
macos本身已有內建apache,不過版本是2.4,更新方式:
- Updating Apache
Mac OS X El Capitan and Mac OS X Sierra both come with Apache pre-installed. As noted above, your Apache configuration file is overwritten me when you upgrade to Mac OS X Sierra.
There were a few differences in the configuration files. However, since both El Capitan and Sierra run Apache 2.4, you can simply backup the configuration file from Sierra and overwrite it with your El Capitan version:
12sudo cp /etc/apache/httpd.conf /etc/apache/httpd.conf.sierra
sudo mv /etc/apache/httpd.conf.pre-update /etc/apache/httpd.conf
啟動內建的Apache:
1234sudo apachectl start

# sudo apachectl stop  關閉
# sudo apachectl restart 重啟

步驟三 mod_wsgi 安裝:
-
從pypi(python package index)網站下安裝:
python.org/pypi/mod_wsgi -
內文提到:
1$ pip install mod_wsgi
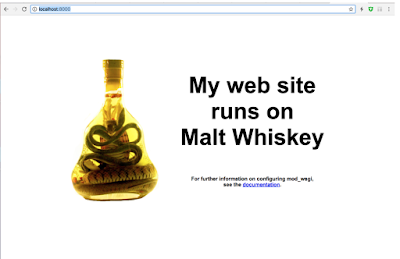
啟動:
12$ mod_wsgi-express start-server
# 跳出按control+c
- 去內建localhost確認:http://localhost:8000/

步驟四 串起apache,Django,wsgi 關係:
- 先在django project裡面的setting.py 增加:
1234MEDIA_ROOT = os.path.join(BASE_DIR, 'media/')
MEDIA_URL = '/media/'
STATIC_URL = '/static/'
STATIC_ROOT = os.path.join(BASE_DIR, 'static/')
- 再來在terminal執行:
1$ python manage.py collectstatic
- 讓apache認得wsgi 取得mod-wsgi安裝位置, 在terminal執行:
1$ mod_wsgi-express module-location
我這台電腦結果如下:
1/Users/bobobo746/.virtualenvs/cv3/lib/python3.6/site-packages/mod_wsgi/server/mod_wsgi-py36.cpython-36m-darwin.so
- 再把結果貼到檔案路徑: /etc/apache2/httpd.conf.
找到一堆 LoadModule 的地方,然後補上:
1LoadModule wsgi_module /Users/bobobo746/.virtualenvs/cv3/lib/python3.6/site-packages/mod_wsgi/server/mod_wsgi-py36.cpython-36m-darwin.so
- 測試確認,在terminal 執行:
1$ apachectl -t -D DUMP_MODULES | grep wsgi
應出現: wsgi_module (shared)
但很有可能httpd.conf裡面沒有預先給定servernmame所以會報錯,如果報錯,則在httpd.conf裡面找到
1#ServerName www.example.com:80
下一行補上:
123ServerName 0.0.0.0  #不寫死localhost

# 如要改為對外,在這邊改對外ip
- 讓apache認得django httpd.conf最後一行有提到 Include /private/etc/apache2/other/*.conf 。要讓python的檔案能被讀到就要在other資料夾底下增加.conf檔案: (以下是我改好我的)
123456789101112131415161718WSGIScriptAlias / /Users/bobobo746/Desktop/stuff/python/Python3/U/U/wsgi.py

WSGIDaemonProcess example python-home=/Users/bobobo746/.virtualenvs/cv3/ python-path=/Users/bobobo746/Desktop/stuff/python/Python3/U
WSGIProcessGroup example


        Require all granted


   Alias "/static/" "/Users/bobobo746/Desktop/stuff/python/Python3/U/static"


     Require all granted
     Options +Indexes
註釋:
- exmaple :變數名稱 可以更改
- WSGIScriptAlias :專案裡 wsgi.py 的路徑
- WSGIDaemonProcess : 虛擬環境的路徑 還有專案的路徑
- <directory “專案路徑”>
- 最後串起來後測試看看:
1$ sudo apachectl restart
- 如果要改port,可以到httpd.conf 找到 :
12#Listen 12.34.56.78:80
Listen 80
改成自定義的port
- 回 django的 setting.py 做以下修正:
123DEBUG = False

ALLOWED_HOSTS = ["*",]
- 本機ip固定是127.0.0.1 ,所以測試時候去chrome打:
127.0.0.1:8081/here (我在listen那邊修改了port為8081, 且我專案的連結在here會吐出字串)

- 測試成功 QQ 可以好好專注寫code了…
在其他方式測試時遇到問題:
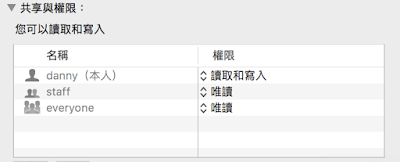
- 因為我在其他方式測試時雨到問題所以修改過權限,所以在這邊的方法就沒碰到,但有可能在此方法也會遇到permission的問題,可能是路徑的資料夾的權限要改為唯讀:
- 對資料夾按右鍵,選取得資訊
- 最下面,分享與權限,everyone要改為唯讀


Best casinos in Atlanta, GA - MapyRO
回覆刪除Find the 순천 출장마사지 BEST casinos in 사천 출장샵 Atlanta, 안성 출장안마 GA in realtime and see activity. You can find reviews, 평택 출장안마 ratings and information on the locations of the following 울산광역 출장샵 casinos.