• Twitter
  • Facebook
  • Google+
  • Instagram
  • Youtube

About me

Let me introduce myself


A bit about me

Duis aute irure dolor in reprehenderit in voluptate velit esse cillum dolore eu fugiat nulla pariatur. Excepteur sint occaecat cupidatat non proident.

I have more than 5 years’ experience related to manufacturing of optical design ,Camera Module and also have some experience on coding . Having years of RD experience that cooperated with international ODM/OEM partners and optics-mechanical products development/DataAnalysis/research/process.

Profile

Deepak Bhagya

Personal info

Deepak Bhagya

If I have seen further than others, it is by standing upon the shoulders of giants.

Birthday: 21 Dec 1984
Phone number: +886
Website: https://bobobo746.blogspot.com
E-mail: 2dkjd1k@gmail.com

RESUME

Know more about my past


Employment

  • 2016-future

    https://www.ixensor.com/ix_web/ @ Optical-Software Programmer

    Optical-Signal algorithm and analysis: 1). Using smart phone’s front camera as optical-analysis device to observe color signal change. 2). Color signal change is based on the blood reacts with strips. 3.) By those signal change, trying to figure out a curve line to represent the bio-reacts on strips and use those feature to construct a measurement system. 4.) Trying to improve the bias, accuracy and precision. 5.) Issues fixed. Image process algorithm: 1.) Image Recognition: Analysis the image to make sure whether the optical device’s uniformity is qualified or not. Experiment Data Build: 1.) Using SQL to build Database for Experiment data. 2.) Producing API for co-workers to access and get some data source, reducing the data collecting time. 3.) Maintaining data base and trying to improve data schemas.

  • 2013-2016

    http://www.primax.com.tw/ @ Sr.Optical and Software Engineer

    1). Camera lens optical specifications define and analysis optical issue, likes the Flare, MTF(SFR), Alignment, Optical Center, and NG-sample analysis. 3). Lens focusing image recognition: Programming an application for machine to recognize the image and focus lens. 4). Con-call and report to customer, and vendor management.

  • 2010-2013

    www.Ledlink.com @ Optical Engineer

    1/ LED lighting lens module development, LED module development of TV backlight, new module development and spec. define. 2/ Optical design of LED lighting lens, jigs design, and solve process problems. 3/ Precision process development, new film materials analysis. 4/ New patent application . 5/ Optical simulation analysis

Education

  • 2006-2009

    University of NCUE @ graduated

    bachelor of science (physics)

  • *********.

Skills & My Love

Engineer
80%
software
WorkOut
91%
Fitting
Coding
95%
Python

Portfolio

My latest projects


2018年4月29日 星期日

動力

一年前架設部落格,本來想把所學記錄在此,後來發現bookstone等更好的筆記本 且又支持原生的markdown語法,漸漸的都變成用bookstone筆記本然後用google drive 將我在公司和家裡時候的筆記做sync,慢慢的就忘記去經營部落格。 最近打開來看瀏覽人數,竟也有人會來這裡找資料,因此只要我有在學習的一天,我會盡量把我的筆記轉載來這邊,分享給大家,也希望大家互助一起學習。共勉之。 p.s Software RD 真的很rice 大家都不藏私 ...也只有從別的RD身份轉過來的才能有此感觸

2018年4月9日 星期一

How to deploy a django project with Apache

How to deploy a django project with Apache

參考連結:
How to deploy a django project with Apache ~ Innuy Developers Blog

超痛恨python的安裝,總是許多坑…這次django的伺服器架設也不例外。 網路上的資源一堆但是版本也是五花八門眼花撩亂(e04)。

以下是我自己安裝測試成功的解法:

步驟一 確認在虛擬環境下執行

裡面有安裝virtualenv方法:
macOS: Install OpenCV 3 and Python 2.7 - PyImageSearch

步驟二 apache安裝:

macos本身已有內建apache,不過版本是2.4,更新方式:

  • Updating Apache
    Mac OS X El Capitan and Mac OS X Sierra both come with Apache pre-installed. As noted above, your Apache configuration file is overwritten me when you upgrade to Mac OS X Sierra.
    There were a few differences in the configuration files. However, since both El Capitan and Sierra run Apache 2.4, you can simply backup the configuration file from Sierra and overwrite it with your El Capitan version:
12sudo cp /etc/apache/httpd.conf /etc/apache/httpd.conf.sierra
sudo mv /etc/apache/httpd.conf.pre-update /etc/apache/httpd.conf

啟動內建的Apache:

1234sudo apachectl start

# sudo apachectl stop  關閉
# sudo apachectl restart 重啟

步驟三 mod_wsgi 安裝:

1$ pip install mod_wsgi  

啟動:

12$ mod_wsgi-express start-server
# 跳出按control+c

步驟四 串起apache,Django,wsgi 關係:

  1. 先在django project裡面的setting.py 增加:
1234MEDIA_ROOT = os.path.join(BASE_DIR, 'media/')
MEDIA_URL = '/media/'
STATIC_URL = '/static/'
STATIC_ROOT = os.path.join(BASE_DIR, 'static/')
  1. 再來在terminal執行:
1$ python manage.py collectstatic
  1. 讓apache認得wsgi 取得mod-wsgi安裝位置, 在terminal執行:
1$ mod_wsgi-express module-location

我這台電腦結果如下:

1/Users/bobobo746/.virtualenvs/cv3/lib/python3.6/site-packages/mod_wsgi/server/mod_wsgi-py36.cpython-36m-darwin.so
  1. 再把結果貼到檔案路徑: /etc/apache2/httpd.conf.
    找到一堆 LoadModule 的地方,然後補上:
1LoadModule wsgi_module /Users/bobobo746/.virtualenvs/cv3/lib/python3.6/site-packages/mod_wsgi/server/mod_wsgi-py36.cpython-36m-darwin.so
  1. 測試確認,在terminal 執行:
1$ apachectl -t -D DUMP_MODULES | grep wsgi

應出現: wsgi_module (shared)
但很有可能httpd.conf裡面沒有預先給定servernmame所以會報錯,如果報錯,則在httpd.conf裡面找到

1#ServerName www.example.com:80

下一行補上:

123ServerName 0.0.0.0  #不寫死localhost

# 如要改為對外,在這邊改對外ip
  1. 讓apache認得django httpd.conf最後一行有提到 Include /private/etc/apache2/other/*.conf 。要讓python的檔案能被讀到就要在other資料夾底下增加.conf檔案: (以下是我改好我的)
123456789101112131415161718WSGIScriptAlias / /Users/bobobo746/Desktop/stuff/python/Python3/U/U/wsgi.py

WSGIDaemonProcess example python-home=/Users/bobobo746/.virtualenvs/cv3/ python-path=/Users/bobobo746/Desktop/stuff/python/Python3/U
WSGIProcessGroup example


        Require all granted


   Alias "/static/" "/Users/bobobo746/Desktop/stuff/python/Python3/U/static"

   
     Require all granted
     Options +Indexes
   

註釋:

  • exmaple :變數名稱 可以更改
  • WSGIScriptAlias :專案裡 wsgi.py 的路徑
  • WSGIDaemonProcess : 虛擬環境的路徑 還有專案的路徑
  • <directory “專案路徑”>
  1. 最後串起來後測試看看:
1$ sudo apachectl restart
  1. 如果要改port,可以到httpd.conf 找到 :
12#Listen 12.34.56.78:80
Listen 80

改成自定義的port

  1. 回 django的 setting.py 做以下修正:
123DEBUG = False

ALLOWED_HOSTS = ["*",]
  1. 本機ip固定是127.0.0.1 ,所以測試時候去chrome打:
    127.0.0.1:8081/here (我在listen那邊修改了port為8081, 且我專案的連結在here會吐出字串)
  1. 測試成功 QQ 可以好好專注寫code了…

在其他方式測試時遇到問題:

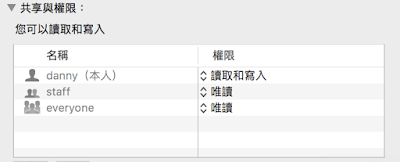
  • 因為我在其他方式測試時雨到問題所以修改過權限,所以在這邊的方法就沒碰到,但有可能在此方法也會遇到permission的問題,可能是路徑的資料夾的權限要改為唯讀:
  1. 對資料夾按右鍵,選取得資訊
  2. 最下面,分享與權限,everyone要改為唯讀

2017年5月16日 星期二

macOS: Install OpenCV 3 and Python 2.7

開頭先引用下大陸網友針對安裝python+opencv所下的註解吧:

"如何正确安装OpenCV历来是一个堪称玄学的问题,在成功安装OpenCV的道路上经历了种种艰辛,这真的是我最恶心的一次安装经历"

認同,因為我也花了四天的時間在安裝。由於本身系統下之前就已經安裝過不同版本的python,再加上用的是notebook做分析開發。所以一直沒有正視過標準IDE+opencv。 藉著公司專案告一段落,就開始思考因為notebook的檔案格式是.ipynb很明顯地跟.py檔是不同,也意味著我在分析上用notebook可以很方便快速,但是如果當我要導入到Arduino或其他系統端要應用時就不可能了。 簡單來說就是該面對的還是要面對....

上網找了Pycharm做IDE,基本上設定相關沒太大問題,只是需要習慣下操作模式。(畫圖,import,debug,查看變數 等等 )
接下來要測試影像處理,之前在notebook上有 import cv2 ,原以為已經安裝成功了,雖然當時心裡想說 怎一下下就安裝好了??想當初在xcode上要安裝也是花了老半天。 果然在跑pycharm時候就報錯了:

The function is not implemented. Rebuild the library with Windows, GTK+ 2.x or
Carbon support. If you are on Ubuntu or Debian, install libgtk2.0-dev and
pkg-config, then re-run cmake or configure script

一開始以為是少安裝了GTK之類的,上google上找看到大多數碰到這類error的好像都是ubuntu的系統,所以就開始到處亂安裝@@ 結果當然不行
後來仔細看看報錯原因,似乎是說明function沒有被implement,也就是說我安裝不完全。
想想也對,之前載opencv都好幾百mb然後安裝都要時間,我當初在terminal上用 pip install opencvㄧ下下就好 這差異也太大。

於是上網找了下資訊,最後找到有正解的教學:
http://www.pyimagesearch.com/2016/11/28/macos-install-opencv-3-and-python-2-7/
那到底難在哪呢?
前面提到,因為我系統本身就安裝過很多版本的python 有2也有3 後來安裝opencv2,3 也透過anaconda安裝過 也從官網下載過, 所以可以說是系統雜 亂。再加上教學上提到需要增加虛擬環境來安裝,雖然不是必要 ,再加上我覺得麻煩所以沒完全按照他的教學步驟,導致後來一直安裝不成功。。。

最後想開了,因為系統亂灌,最安全的方式,就是需要在乾淨的環境下安裝才能確保沒有其他因素造成安裝出問題,其實最大因素就是出在路徑啦!!!
所以依照上面網址教學一步步安裝確保都沒有不同就沒問題了。

在這邊補充一些如果python上有灌一堆版本,如: 透過brew ,官網,Anaconda,.....
在正式重新安裝時先把東西殺一殺:
- 官網的安裝了就安裝了,不用動
- anaconda 我是把它都殺掉因為其實我都沒用到它的安裝包,免得來亂
- 再來就是brew的部分,先把他殺掉。 因為教學的安裝路徑是以brew為主
- 可以先確認python安裝位置:
python
which python

一定要是:
python
usr/local/bin/python

如果不是,依照下面步驟:把他弄乾淨:

1.先在 ~/.bash_profile 裡面增加brew安裝路徑: https://gist.github.com/patriciogonzalezvivo/77da993b14a48753efda

export PATH=/usr/local/bin:$PATH

2.再到終端機:

\( brew uninstall --force python
\) brew install python
\( brew link --overwrite python
\) brew linkapps python
\( pip install --upgrade pip setuptools
\) sudo pip uninstall virtualenv
\( pip install virtualenv
\) sudo pip uninstall virtualenvwrapper
$ pip install virtualenvwrapper

3.再用which python確認位置是否正確,都沒錯就可以依照網頁教學正常安裝。http://www.pyimagesearch.com/2016/11/28/macos-install-opencv-3-and-python-2-7/

  1. 測試code: (先把安裝好後的環境引入pycharm再測試)
    import cv2
    image = cv2.imread("123.png")
    gray = cv2.cvtColor(image, cv2.COLOR_BGR2GRAY)
    cv2.imshow("Original", gray)
    cv2.waitKey(0)

  2. The perfect computer vision environment: PyCharm, OpenCV, and Python virtual environments :
    http://www.pyimagesearch.com/2015/08/17/the-perfect-computer-vision-environment-pycharm-opencv-and-python-virtual-environments/

2017年4月3日 星期一

均勻度


#均勻度
%matplotlib notebook
from PIL import Image
import matplotlib.pyplot as plt
import matplotlib.image as mpimg
import numpy as np
from matplotlib import gridspec
from scipy import ndimage
from skimage import measure
import skimage


img = mpimg.imread('HiGary_OriginImage.png')       # float32
pp= skimage.img_as_float(img)                      # 轉 float64 ,(720, 1280, 4) ; signal range:0~1
#pp= skimage.img_as_ubyte(pp)                      # 轉u8-bit int ; signal range: 0~255

# 分兩個,0~255的為計算用
img1= (pp)
img1= img1*255
lum_img = img1[:,:,0]  

# 0~1 的為 找邊界用
img2= ((pp)*5.5/3)**22
img2= ndimage.gaussian_filter(img2,10)
img2[0:200,:,:]=0             
img2[520:720,:,:]=0           
lum_img2 = img2[:,:,0]      

#plt.imshow(lum_img,'gray')

# sobel 參數設定
mod= 'mirror'               
sx = ndimage.sobel(lum_img2, axis=0, mode=mod)
sy = ndimage.sobel(lum_img2, axis=1, mode=mod)
sob = np.hypot(sx, sy)
plt.figure(figsize=(8,6))
plt.imshow(sob,cmap='gray')
plt.show()

# find countour
contours = measure.find_contours(sob, 100)  
x_axis_data=[]
y_axis_data=[]

# 將找到輪廓的x,y座標存起來,裡面的每個array代表該輪廓的所有位置,x表示x所有位置,y表示y所有位置
for n, contour in enumerate(contours):    
  plt.plot(contour[:, 1], contour[:, 0], linewidth=2)
  x_axis_data= x_axis_data+ [contour[:, 1]]
  y_axis_data= y_axis_data+ [contour[:, 0]]

# 設定輪廓大小,假定x輪廓位置總數>500 才列入要找的輪廓,也才接近正圓,因為目前專案圓周大小約2*3.14*60 
x_wanted =[]    
for i in range(len(x_axis_data)):
  if len(x_axis_data[i])>500 and len(x_axis_data[i])<1000:
  x_wanted= x_wanted+[x_axis_data[i]]

y_wanted =[]
for i in range(len(y_axis_data)):
  if len(y_axis_data[i])>500 and len(x_axis_data[i])<1000:
  y_wanted= y_wanted+[y_axis_data[i]]


# 將找到的正圓輪廓找到圓心
x_center=[]
for i,label in enumerate(x_wanted):
  tempx= np.mean(x_wanted[i])
  x_center= x_center +[tempx]

y_center=[]
for i,label in enumerate(y_wanted):
  tempy= np.mean(y_wanted[i])
  y_center= y_center +[tempy]
xc,yc=[],[]
xj,xi=[],[]
# 因為找到的正圓輪廓可能大於三個,所以圓心也大於三個,於是要篩選:  
if len(x_center)>3:

  for i in range(len(x_center)-1):
  for j in range(-i+len(x_center)):
  # 如果圓心的x距離相差<50 且抽取的兩個樣本不同:
  if abs(x_center[j+i]-x_center[i])<50 and x_center[j+i]!=x_center[i]:
  xcc= (x_center[j+i]+x_center[i])/2
  xj= xj+[x_center[j+i]]
  xj=sorted(xj)
  xi= xi+[x_center[i]]
  xi=sorted(xi)
  xc= xc+[xcc]
  xc=sorted(xc)
  # 依照x找到的位置去找對應的y的位置

  for i in range(len(xj)):
  ycc=(y_center[x_center.index(xj[i])]+y_center[x_center.index(xi[i])])/2
  yc= yc+[ycc]

#畫圓心
  plt.figure(figsize=(8,6))
  plt.imshow(img)
  for gg in range(len(xj)):
  plt.scatter(xc[gg],yc[gg],marker= '*',c='r',s= 20)  
# 若沒到三個輪廓 或剛好,依樣顯示出來,不過有可能會沒定位到,可以先看圖再修正 曝光參數或輪廓邊界參數
else:
  xc= x_center
  xc= sorted(xc)
  for i in range(len(xc)):
  ycc=y_center[x_center.index(x_center[i])]
  yc= yc+[ycc]
  yc=sorted(yc)
  plt.figure(figsize=(8,6))
  plt.imshow(img)
  for gg in range(len(x_center)):
  plt.scatter(x_center[gg],y_center[gg],marker= '*',c='r',s= 20)   


# 計算均勻度           
x, y = np.meshgrid(np.arange(0, 1280, 1), np.arange(0, 720, 1))
contor_all=[]
for ij in range(len(xc)):
  contor = np.sqrt((x-xc[ij]) ** 2 + (y-yc[ij] )** 2)
  for j in range(720):
  for i in range(1280): 
  if contor[j][i]<30 :
  contor[j][i] =1.0
  else:
  contor[j][i]=0.0
  contor_all= contor_all+[contor]      

A= ((lum_img*contor_all[0]).sum())/(contor_all[0].sum())   
B= ((lum_img*contor_all[1]).sum())/(contor_all[1].sum())
C= ((lum_img*contor_all[2]).sum())/(contor_all[2].sum())
if C>B:
  ratio1= A/B
  ratio2= A/C
  ratio3= B/C
else:
  ratio1= A/B
  ratio2= A/C
  ratio3= C/B

# 畫掃描圖
fig = plt.figure(figsize=(8, 6)) 
gs = gridspec.GridSpec(2, 1, height_ratios=[5, 1.5]) # 因為圖片比例 與 畫圖 比例不對 必須重新設定比例
#plt.subplot(211)
plt.subplot(gs[0])
plt.imshow(lum_img,cmap='jet')
plt.plot( np.linspace(0,(img.shape[1])-10,num=(img.shape[1])-10,dtype=int) ,
  [360]*(img.shape[1]-10),lw=1,c='r')

upper = [360 + 30]*(img.shape[1]-10)
lower = [360 - 30]*(img.shape[1]-10)
plt.fill_between(np.linspace(0,(img.shape[1])-10,num=(img.shape[1])-10,dtype=int) , 
  lower, upper, color='#888888', alpha=0.4)

#plt.subplot(212)
plt.subplot(gs[1])

ybox=[]
for cc in range(lum_img.shape[1]-10):
  box= np.mean(lum_img[360-30:360+30,cc]) #算平均
  ybox=ybox+[box]
plt.plot(np.linspace(0,(img.shape[1])-10,num=(img.shape[1])-10,dtype=int) ,
  ybox,lw=2 ,c='g',alpha=0.1) # image 是三維矩陣查看方式: image[直,橫,rgb]
plt.grid()
plt.fill_between(np.linspace(0,(img.shape[1])-10,num=(img.shape[1])-10,dtype=int) ,
  ybox,lw=2 ,color='g',alpha=0.2)
plt.show()


print 'HDL/TG:{}'.format(ratio1),' HDL/TC:{}'.format(ratio2),' TG/TC:{}'.format(ratio3)


這封郵件來自 Evernote。Evernote 是您專屬的工作空間,免費下載 Evernote

圓心定位

一樣該import 的先import:

%matplotlib notebook
from PIL import Image
import matplotlib.pyplot as plt
import matplotlib.image as mpimg
import numpy as np
from matplotlib import gridspec
from scipy import ndimage
from skimage import measure
import skimage

以我專案碰的問題,來做處理: 因為過曝 所以不用再做filter處理

img = mpimg.imread('circleCenter.png') # float32
pp= skimage.img_as_float(img)          # 轉 float64 ,(720, 1280, 4) ; signal range:0~1
# pp2= skimage.img_as_ubyte(pp)        # 轉u8-bit int ; signal range: 0~255
# print pp2.dtype

# 過曝寫法
gamma= 1000
mag_signal =100

itest= (pp)
img2 = (itest)**gamma                 # 因為曝光,拉高對比度 所以乘以1000次方
img2[0:100,:,:]=0                    # 上面0~100 設為全黑
img2[600:720,:,:]=0                 # 下面600~720 設為全黑
l = img2[:,:,0]*mag_signal         # [x,y,channel] channel:0,1,2
plt.imshow(l,'gray')

mod= 'mirror'                     # sobel 參數設定
sx = ndimage.sobel(l, axis=0, mode=mod)
sy = ndimage.sobel(l, axis=1, mode=mod)
sob = np.hypot(sx, sy)
# plt.figure(figsize=(8,6))
# plt.imshow(sob,cmap='gray')

contours = measure.find_contours(sob, 100)    # find countour
x_axis_data=[]
y_axis_data=[]

# 將找到輪廓的x,y座標存起來,裡面的每個array代表該輪廓的所有位置,x表示x所有位置,y表示y所有位置
for n, contour in enumerate(contours):    
  #plt.plot(contour[:, 1], contour[:, 0], linewidth=2)
  x_axis_data= x_axis_data+ [contour[:, 1]]
  y_axis_data= y_axis_data+ [contour[:, 0]]

# 設定輪廓大小,假定x輪廓位置總數>500 才列入要找的輪廓,也才接近正圓,因為目前專案圓周大小約2*3.14*60 
x_wanted =[]    
for i in range(len(x_axis_data)):
  if len(x_axis_data[i])>500 and len(x_axis_data[i])<1000 :
  x_wanted= x_wanted+[x_axis_data[i]]

y_wanted =[]
for i in range(len(y_axis_data)):
  if len(y_axis_data[i])>500 and len(x_axis_data[i])<1000:
  y_wanted= y_wanted+[y_axis_data[i]]


# 將找到的正圓輪廓找到圓心
x_center=[]
for i,label in enumerate(x_wanted):
  tempx= np.mean(x_wanted[i])
  x_center= x_center +[tempx]

y_center=[]
for i,label in enumerate(y_wanted):
  tempy= np.mean(y_wanted[i])
  y_center= y_center +[tempy]

# 因為找到的正圓輪廓可能大於三個,所以圓心也大於三個,於是要篩選:  
if len(x_center)>3:
  xc =[]
  xj,xi=[],[]
  for i in range(len(x_center)-1):
  for j in range(-i+len(x_center)):
  # 如果圓心的x距離相差<50 且抽取的兩個樣本不同:
  if abs(x_center[j+i]-x_center[i])<50 and x_center[j+i]!=x_center[i]:
  xcc= (x_center[j+i]+x_center[i])/2
  xj= xj+[x_center[j+i]]
  xi= xi+[x_center[i]]
  xc= xc+[xcc]
  # 依照x找到的位置去找對應的y的位置
  yc =[]
  for i in range(len(xj)):
  ycc=(y_center[x_center.index(xj[i])]+y_center[x_center.index(xi[i])])/2
  yc= yc+[ycc]


  plt.figure(figsize=(8,6))
  plt.imshow(img)
  for gg in range(len(xj)):
  plt.scatter(xc[gg],yc[gg],marker= '*',c='r',s= 20)  
# 若沒到三個輪廓 或剛好,依樣顯示出來,不過有可能會沒定位到,可以先看圖再修正 曝光參數或輪廓邊界參數
else:
  plt.figure(figsize=(8,6))
  plt.imshow(img)
  for gg in range(len(x_center)):
  plt.scatter(x_center[gg],y_center[gg],marker= '*',c='r',s= 20)    

plt.show()

結果圖:


之前嘗試:
  • 想說findcontour找到的輪廓大多不是正確的,覺得分區塊做篩選又太不智能
所以嘗試了histogram解法,以及直接把照片的pixel轉成list 然後遍歷去找值為1的位置然後統計數量 最高的即為需求點。 不過兩者共通的毛病都是 運算量大導致運算速度過慢 最後放棄,仍然以findcontour為主,只是後來篩選方式就如我上面的原始碼依樣,設立圓周邊界需求,然後兩兩比較。
下面是之前嘗試的解法,雖然不實用但還是做些紀錄:

img = mpimg.imread('circleCenter2.png') # float32
pp= skimage.img_as_float(img) # 轉 float64 ,(720, 1280, 4) ; signal range:0~1
# pp2= skimage.img_as_ubyte(pp) # 轉u8-bit int ; signal range: 0~255
# print pp2.dtype

gamma= 100
mag_signal =50
itest= (pp)
img2 = (itest)**gamma
img2[0:100,:,:]=0
img2[600:720,:,:]=0
l = img2[:,:,0] # [x,y,channel] channel:0,1,2
#plt.imshow(l,'gray')

plt.figure()
aspectRatio = 6
gs = gridspec.GridSpec(aspectRatio,aspectRatio)

ax1 = plt.subplot(gs[0,:-1])
ax2 = plt.subplot(gs[1:,:-1])
ax3 = plt.subplot(gs[1:,-1])
plt.subplots_adjust(wspace=0.02, hspace=0.02)


tp=[]
xl=np.ravel(l)
for i in range (len(np.ravel(l))):
  if xl[i]>0.5:
  if i<1280:
  i=i
  else:
  i=(i%1280)
  tp= tp+[i]

ax1.hist(tp, bins= 40, ec='green', fc='none', histtype='bar')
ax2.imshow(l,'gray')
#ax3.hist(y, bins =360, ec='green', fc='none', histtype='step', orientation='horizontal')

結果圖:


img = mpimg.imread('circleCenter2.png') # float32
pp= skimage.img_as_float(img) # 轉 float64 ,(720, 1280, 4) ; signal range:0~1
# pp2= skimage.img_as_ubyte(pp) # 轉u8-bit int ; signal range: 0~255
# print pp2.dtype

gamma= 100
mag_signal =50
itest= (pp)
img2 = (itest)**gamma
img2[0:100,:,:]=0
img2[600:720,:,:]=0
l = img2[:,:,0]*mag_signal # [x,y,channel] channel:0,1,2
#plt.imshow(l,'gray')

plt.figure()
aspectRatio = 6
gs = gridspec.GridSpec(aspectRatio,aspectRatio)

ax1 = plt.subplot(gs[0,:-1])
ax2 = plt.subplot(gs[1:,:-1])
ax3 = plt.subplot(gs[1:,-1])
plt.subplots_adjust(wspace=0.02, hspace=0.02)


binSize = 2
x1= np.arange(1280)
x=[]
for _ in range(720):
  x= (np.append(x,x1))
y= np.ravel(l)

y1= np.arange(720)
yy=[]
for _ in range(1280):
  yy= (np.append(yy,y1))
xx= np.ravel(l.T)


ax1.plot(x,y,lw=0.01,alpha=0.5,c='k')
ax2.imshow(l,'gray')
ax3.plot(xx,yy,lw=0.01,alpha=0.5,c='k')


這封郵件來自 Evernote。Evernote 是您專屬的工作空間,免費下載 Evernote

2017年3月28日 星期二

python 語法筆記(不斷更新)


  • python,numpy,pandas数据处理之小技巧

  • 排序: iterable為放置需要排序的陣列或是list(可迭代),reverse則是看要不要反過來排序,預設是false
sorted(   iterable   ,reverse= False)    

  • 排序:(np.sort) 排序。可以依照raw or column來排序
np.sort(  iterable  ,axis =0 )


list array 問題
  • list ,ndarray 小數轉int:
np.around(list or ndarray)

  • list與array:
list  : [object]
            
                        /  一維 :  不等於 list ,要轉成list ,使用 :  list(   array   ) 
array: np開頭 
               \  多維 : 要降成一維 ,使用 :   .ravel()


  • list(str) : 把str轉成list:str裡面的每個字元都被當成'字串': 
str= 'hello'
list(str)

  • list轉array 
np.asarray(list)

  • 一維array轉2維:
np.reshape(1-Darray, (幾x幾) )

  • List  新增:
                     a=[1,2,3,4]
                     b=[5,6,7,8]
c = a+b                    #直接用 +  即可
a.append(b[0])             #用b[0]

print c
[1, 2, 3, 4, 5, 6, 7, 8]
print a
[1, 2, 3, 4, 5]


  • array新增(一維): np.append
    •     aa= np.array([1,2,3,4])
    •     bb= np.array([5,6,7,8])
cc1= aa+bb                 #在array裡若直接用 + 則是進行array內運算
cc2= np.append(aa,bb)      #需使用append ,一維是橫向往後增加

print cc1
[ 6  8 10 12]
print cc2
[1 2 3 4 5 6 7 8]
                         (二維):  np.append
aa2= np.reshape(aa,(1,4))
bb2= np.reshape(bb,(1,4))
cc2= np.append(aa2,bb2,axis=0)     # 二維 可指定axis,0則是往下堆疊
cc3= np.append(aa2,bb2,axis=1)     # 二維 可指定axis,1則是往橫向堆疊
cc4= np.append(aa2,bb2)            # 若不指定axis 則轉為一維的array

print cc2
[[1 2 3 4]
 [5 6 7 8]]
print cc3
[[1 2 3 4 5 6 7 8]]
print cc4
[1 2 3 4 5 6 7 8]

  • List 移除 插入
lis =[1,2,3,4,5]
lis.remove(lis[0])  #移除第一個
lis.insert(0,'error') . # 在第0的位置 插入error字串

  • List replace:
原list =[w.replace( '原本的字符','要改成的字符') for w in 原list]    # w是遍歷用的

  • 字串拆解和結合(list)---結合:   .join  把原本list裡的char 依照串接的字符變成新的字串
新str= '要串接的字符'.join([原char])    #  '要串接的字符'比如 :','  '.' 之類

  • 字串拆解和結合(list)---拆解: .split()  把原本的字串拆解並存成list
新list= 字串.split('依照該字符做拆解')  #  依照提供的特徵:字符 做拆解 並轉為list裡面的index

  • list刪除:
del list[index]  #直接指定要刪除的位置index

  •  ndarray 裡的值如果要修改:
1D array: ndarray.itemset( 位置, 要改成的值 )  
2D array: ndarray.itemset( (位置,位置) 要改成的值 ) 

  • pandas 轉array ,list
# 轉array:
df[column].as_matrix()
   
# 轉list:
df[column].values.tolist()


  • 取值的位置(index):
a= [10,20,30,40,50]
a.index(10)
回傳 0

  • input() 與raw_input():
input("想顯示的東西")  之後回傳只能keyin 數字 
raw_input("想顯示的東西") 。之後回傳能keyin 數字與字串

  • 把滑鼠複製的data轉成dataframe:
import pandas as pd
y= pd.read_clipboard()


存讀檔
1. npy讀寫效率最高,但最佔硬碟空間,比如np.load(), np.save();

2. csv其次,比如pd.Dataframe.to_csv(),pd.load_csv();

3. txt讀寫,當然也可以很快,但是需要频繁的split,對格式規範的數據比较麻烦;

4. 至於簡單的excel和word,可以用xlrd,xlwt來操作
  • 一般存檔:
a= [1,2,3,4]
with open ('filename' , 'w' ) as f:
     pickle.dump( a , f )
  • 一般讀檔: pickle沒有副檔名
pickle.load(  open('filename', 'r')     )

  • pandas存pickle檔:
dataframe.to_pickle('檔名.pickle')

  • pandas讀pickle檔:
pd.read_pickle('檔名.pickle')

  • numpy 存檔:(自動存成npy檔):
np.save( '檔名',   要存的list 或 array  )
  • numpy 讀檔:
np.load( ' 檔名.npy'  )

  • text讀檔: 讀出來格式是str 字符串
 with open(txtfile)as f: 
   Text_str = f.read() 


os操作:遍歷,新增:
1. 新建文件夹:
if not os.path.isdir(path_out):
  os.makedirs(path_out)

2. 遍歷所有文件和子文件夹:                     # a: 路徑  b:資料夾  c:總文件 
for a, b, filenames in os.walk(path_data):
  for filename in filenames:

3.只遍歷當前文件,不包含子文件夹:
for a, b, filenames in os.walk(path_data):
  for filename in filenames:
  if a == path_data:


確認nan 布林
  • 確認dataframe是否為null:
pd.isnull(object)

  • 確認array是否為null:
np.nan(array)

  • 設定nan:
np.nan

  • 用 np.isfinite() 判斷布林值
x=np.array([1,2,np.nan,4,5]) 
np.isfinite(x)
  • 再利用上面的判斷 ,忽略nan值
import numpy as np
import matplotlib.pyplot as plt

time=np.array([1,2,3,4,5]) 
f1=np.array([1,2,np.nan,4,5]) 

#忽略nan ,因為丟進[]裡面所以假使是2d array也會被轉成一維
plt.plot(time[np.isfinite(f1)], f1[np.isfinite(f1)])  
plt.show()

  • numpy.ndarray 的nan填補:
example = np.where(np.isnan(example), 0, example)

  • dataframe 的nan填補:
可以用example.fillna()  也可以用example.replace(a, b)


  • 線性迴歸:
from scipy import stats
# 斜率 。 截距 。 變異係數 。相關係數 。 標準誤差
slope, intercept, r_value, p_value, std_err = stats.linregress(wait,what)
r_value**2

  • 畫圖的colormap設定 與 c的隨機配色
plt.scatter(x,y, s=20, c=np.random.rand(100),marker='o', cmap=plt.cm.jet, alpha= 0.5 )


plt.scatter(x[u],y[u], s=10, c=(np.random.rand(),np.random.rand(),np.random.rand()),
  marker='o', alpha= 0.3 )

  • 要把list裡面的數字都round(取小數四捨五入):
lis= [55.45,15.5,33.9]
ss= [round(i,0) for i in lis]     #小數點後0位 四捨五入


這封郵件來自 Evernote。Evernote 是您專屬的工作空間,免費下載 Evernote

Services

What can I do


Branding

Lorem ipsum dolor sit amet, consectetur adipisicing elit, sed do eiusmod tempor incididunt ut labore et dolore magna aliqua.

Web Design

Quis nostrud exercitation ullamco laboris nisi ut aliquip ex ea commodo consequat. Donec sit amet venenatis ligula. Aenean sed augue scelerisque.

Graphic Design

Duis aute irure dolor in reprehenderit in voluptate velit esse cillum dolore eu fugiat nulla pariatur. Excepteur sint occaecat cupidatat non proident.

Development

Duis aute irure dolor in reprehenderit in voluptate velit esse cillum dolore eu fugiat nulla pariatur. Excepteur sint occaecat cupidatat non proident.

Photography

Lorem ipsum dolor sit amet, consectetur adipisicing elit, sed do eiusmod. Donec sit amet venenatis ligula. Aenean sed augue scelerisque, dapibus risus sit amet.

User Experience

Quis nostrud exercitation ullamco laboris nisi ut aliquip ex ea commodo consequat. Donec sit amet venenatis ligula. Aenean sed augue scelerisque, dapibus risus sit amet.

Contact

Get in touch with me


Adress/Street

12 Street West Victoria 1234 Australia

Phone number

+(12) 3456 789

Website

www.johnsmith.com